Freehand Drawing
Do you like to meet people? Freehand drawing will allow you to go out into the world and draw wherever you like.
Learning Freehand Drawing might be the most challenging of all the ways to produce a likeness.
It will test your patience, and will either make or break you (unless of course you are more talented than most of us).You'll need... a simple line drawing, such as from a coloring book a crayon- any dark color paper- any kind, any size (bigger is better) a place to draw- a table is best If you really want to be an artist who creates works using no aids, then it is absolutely necessary for you to practice freehand drawing as often as you possibly can.The technique that I learned some time ago is a neat way to transition into being able to draw anything freehand.
Let's get started!
Place your reference photo and blank paper in front of you as follows...If you draw with your right hand, place your reference photo at the left of your drawing paper. Do the reverse if you're drawing with your left hand.Place your paper, and reference material in a spot that allows you to comfortably lay your arms on the table.If you'd like, you can tape the paper down to keep it from moving on you.
The Freehand Drawing Technique
|
Left hand |
Right hand |
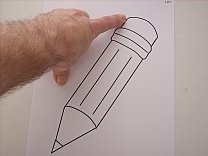

Place the index finger of your non-drawing hand on a point along a line on your reference material.
Next, place the crayon at a point on your drawing paper that is in direct relationship to where your index finger is on the coloring book page. So if you have your finger at the lower-left of the reference page, then your crayon will be at the lower-left of your drawing paper.
Now, while focusing your eyes on only the tip of you finger, move it along the line. Remember to keep following your finger without looking away to see what your drawing hand is doing, which should be
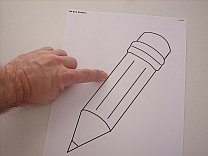
 moving in the same way as your finger. Keep both hands in sync, as if they were connected by some invisible force; starting and stopping at the same time and at the same place.
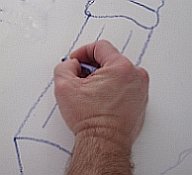
When you come to a place that requires you to lift your crayon, just lift it up slightly while still following you finger. When your finger gets to the new location then place the crayon back onto the paper and continue drawing.
Now, you may be asking, "What does this have to do with freehand drawing?"
After practicing several hours using your finger, you then do the same activity except that instead of using your finger you use only your eyes to follow the lines.
Now your eyes and drawing hand are moving together, starting and stopping at the same places.
Then after you have practiced with the coloring book, you will move on to doing the same thing with real objects
With enough practice you'll be able to go out into the world and draw trees, buildings, cars, animals, and people.
If you're braver than me you could go to your favorite café and sketch people around you.
It's likely that someone will look over your shoulder, comment as to the beauty of your work, and then ask you if you could do a commissioned work for her. Or, you may get asked if you give lessons, which could be another way to earn an income.
Exciting...isn't it?
Creating an Outline
Subscribe to my Newsletter